Thursday, 9 November 2017
Magento 2 : Apply Custom Discount to cart
Offering some special discount to customers is a good way to attract more customers & indirectly increase sales of site !
In Magento 2, there are so many ways available for apply some special discounts after adding product to cart, but here some special things which allowed you for add dynamic discount product wise !
For that need to follow some steps for make it work,
A) Create "spe_dis" field with "Decimal" data type in "quote_item" tabel.
B) Override Add.php from core directory form vendor\magento\module-checkout\Controller\Cart\Add.php
OR
B) For Testing update same file in vendor\magento\module-checkout\Controller\Cart\Add.php
After, this line $this->cart->save();
Add below code,
$objectManager = \Magento\Framework\App\ObjectManager::getInstance();
$resource = $objectManager->get('Magento\Framework\App\ResourceConnection');
$connection = $resource->getConnection();
$data=$connection->fetchAll('SELECT item_id FROM quote_item WHERE quote_id='.$this->cart->getQuote()->getId());
if(isset($_REQUEST['spe_dis']) and $_REQUEST['spe_dis'] > 1){
$fianlsf = 0;
foreach($data as $dats){$fianlsf = $dats['item_id'];}
$sql = "Update quote_item Set spe_dis='".$_REQUEST['spe_dis']."' where item_id = ".$fianlsf."";
$connection->query($sql);
}
Note :- Above code save special discount value to DB.
C) Create a hidden text field inside product page form
<input type="hidden" id="spe_dis" value="0" />
set special discount to this field which want to apply product wise.
D) Finally, Unzip files in app/code

This is working for me in Magento 2.1.8 and 2.2.0 also !
Monday, 8 May 2017
Magento2 : Create a custom backend theme
Hello Friends,
Here is the code for create a custom theme for the backend in magento 2 !
Magento2 provide Backend as a admin theme !
Magento 2.X is a quite different process as compare of Magento 1.X, there are few easy steps for it !
Step 1 : Create a theme directory at below location,
app\design\adminhtml\Magento\custom
Step 2 : Now, Create 3 files inside custom directory,
A) composer (This is JSON file)
B) registration (This is PHP file)
C) theme (This is XML file)
Now, Copy/Paste below code in side related files,
Step A : composer (This is JSON file)
{
"name": "magento/theme-adminhtml-custom",
"description": "N/A",
"require": {
"php": "~5.6.0|7.0.2|~7.0.6",
"magento/theme-adminhtml-backend": "~100.0",
"magento/framework": "~100.0"
},
"type": "magento2-theme",
"version": "1.0.0",
"license": [
"OSL-3.0",
"AFL-3.0"
],
"autoload": {
"files": [
"registration.php"
]
}
}
Step B : registration (This is PHP file)
<?php
/**
* Copyright © 2016 Magento. All rights reserved.
* See COPYING.txt for license details.
*/
\Magento\Framework\Component\ComponentRegistrar::register(
\Magento\Framework\Component\ComponentRegistrar::THEME,
'adminhtml/Magento/custom',
__DIR__
);
Step C : theme (This is XML file)
<theme xmlns:xsi="http://www.w3.org/2001/XMLSchema-instance" xsi:noNamespaceSchemaLocation="urn:magento:framework:Config/etc/theme.xsd">
<title>Magento 2 new backend</title>
<parent>Magento/backend</parent>
</theme>
Step 6 : Now, just run upgrade & deploy commands
A) php bin/magento setup:upgrade
B) php bin/magento setup:static-content:deploy
you can see you custom theme name as Magento/custom while deploying !
Here is the code for create a custom theme for the backend in magento 2 !
Magento2 provide Backend as a admin theme !
Magento 2.X is a quite different process as compare of Magento 1.X, there are few easy steps for it !
Step 1 : Create a theme directory at below location,
app\design\adminhtml\Magento\custom
Step 2 : Now, Create 3 files inside custom directory,
A) composer (This is JSON file)
B) registration (This is PHP file)
C) theme (This is XML file)
Now, Copy/Paste below code in side related files,
Step A : composer (This is JSON file)
{
"name": "magento/theme-adminhtml-custom",
"description": "N/A",
"require": {
"php": "~5.6.0|7.0.2|~7.0.6",
"magento/theme-adminhtml-backend": "~100.0",
"magento/framework": "~100.0"
},
"type": "magento2-theme",
"version": "1.0.0",
"license": [
"OSL-3.0",
"AFL-3.0"
],
"autoload": {
"files": [
"registration.php"
]
}
}
Step B : registration (This is PHP file)
<?php
/**
* Copyright © 2016 Magento. All rights reserved.
* See COPYING.txt for license details.
*/
\Magento\Framework\Component\ComponentRegistrar::register(
\Magento\Framework\Component\ComponentRegistrar::THEME,
'adminhtml/Magento/custom',
__DIR__
);
Step C : theme (This is XML file)
<theme xmlns:xsi="http://www.w3.org/2001/XMLSchema-instance" xsi:noNamespaceSchemaLocation="urn:magento:framework:Config/etc/theme.xsd">
<title>Magento 2 new backend</title>
<parent>Magento/backend</parent>
</theme>
Step 6 : Now, just run upgrade & deploy commands
A) php bin/magento setup:upgrade
B) php bin/magento setup:static-content:deploy
you can see you custom theme name as Magento/custom while deploying !
Magento 2 : Create a custom frontend theme
Hello Friends,
Here is the code for how to create a custom theme for the front end in magento 2 !
Magento 2.X is a quite different process as compare of Magento 1.X, there are few easy steps for it !
Step 1 : Create a theme directory at below location,
app\design\frontend\Magento\custom
Step 2 : Now, Create 3 files inside custom directory,
A) composer (This is JSON file)
B) registration (This is PHP file)
C) theme (This is XML file)
Now, Copy/Paste below code in side related files,
Step A : composer (This is JSON file)
{
"name": "magento/custom-module-theme",
"description": "N/A",
"require": {
"php": "~5.6.0|7.0.2|~7.0.6",
"magento/theme-frontend-luma": "~100.0",
"magento/framework": "~100.0"
},
"type": "magento2-theme",
"version": "1.0.0",
"license": [
"OSL-3.0",
"AFL-3.0"
],
"autoload": {
"files": [ "registration.php" ]
}
}
Step B : registration (This is PHP file)
<?php
/**
* Copyright © 2016 Magento. All rights reserved.
* See COPYING.txt for license details.
*/
\Magento\Framework\Component\ComponentRegistrar::register(
\Magento\Framework\Component\ComponentRegistrar::THEME,
'frontend/Magento/custom',
__DIR__
);
Step C : theme (This is XML file)
<theme xmlns:xsi="http://www.w3.org/2001/XMLSchema-instance" xsi:noNamespaceSchemaLocation="urn:magento:framework:Config/etc/theme.xsd">
<title>Magento Custom Theme</title>
<parent>Magento/luma</parent>
<media>
<preview_image>media/preview.jpg</preview_image>
</media>
</theme>
Step 3 : Create directory at below mentioned location,
app\design\frontend\Magento\custom\Magento_Theme\layout
Step 4 : Inside \Magento_Theme\layout create file called default.xml
/* COPY & PASTE this code inside default.xml */
<?xml version="1.0"?>
<page xmlns:xsi="http://www.w3.org/2001/XMLSchema-instance" xsi:noNamespaceSchemaLocation="urn:magento:framework:View/Layout/etc/page_configuration.xsd">
<body>
<referenceBlock name="logo">
<arguments>
<argument name="logo_file" xsi:type="string">images/logo.png</argument>
</arguments>
</referenceBlock>
<remove name="report.bugs"/>
</body>
</page>
Step 5 : Create a media directory inside Magento\custom & upload preview.jpg file inside it !

Step 6 : Now, just run upgrade & deploy commands
A) php bin/magento setup:upgrade
B) php bin/magento setup:static-content:deploy
Here is the code for how to create a custom theme for the front end in magento 2 !
Magento 2.X is a quite different process as compare of Magento 1.X, there are few easy steps for it !
Step 1 : Create a theme directory at below location,
app\design\frontend\Magento\custom
Step 2 : Now, Create 3 files inside custom directory,
A) composer (This is JSON file)
B) registration (This is PHP file)
C) theme (This is XML file)
Now, Copy/Paste below code in side related files,
Step A : composer (This is JSON file)
{
"name": "magento/custom-module-theme",
"description": "N/A",
"require": {
"php": "~5.6.0|7.0.2|~7.0.6",
"magento/theme-frontend-luma": "~100.0",
"magento/framework": "~100.0"
},
"type": "magento2-theme",
"version": "1.0.0",
"license": [
"OSL-3.0",
"AFL-3.0"
],
"autoload": {
"files": [ "registration.php" ]
}
}
Step B : registration (This is PHP file)
<?php
/**
* Copyright © 2016 Magento. All rights reserved.
* See COPYING.txt for license details.
*/
\Magento\Framework\Component\ComponentRegistrar::register(
\Magento\Framework\Component\ComponentRegistrar::THEME,
'frontend/Magento/custom',
__DIR__
);
Step C : theme (This is XML file)
<theme xmlns:xsi="http://www.w3.org/2001/XMLSchema-instance" xsi:noNamespaceSchemaLocation="urn:magento:framework:Config/etc/theme.xsd">
<title>Magento Custom Theme</title>
<parent>Magento/luma</parent>
<media>
<preview_image>media/preview.jpg</preview_image>
</media>
</theme>
Step 3 : Create directory at below mentioned location,
app\design\frontend\Magento\custom\Magento_Theme\layout
Step 4 : Inside \Magento_Theme\layout create file called default.xml
/* COPY & PASTE this code inside default.xml */
<?xml version="1.0"?>
<page xmlns:xsi="http://www.w3.org/2001/XMLSchema-instance" xsi:noNamespaceSchemaLocation="urn:magento:framework:View/Layout/etc/page_configuration.xsd">
<body>
<referenceBlock name="logo">
<arguments>
<argument name="logo_file" xsi:type="string">images/logo.png</argument>
</arguments>
</referenceBlock>
<remove name="report.bugs"/>
</body>
</page>
Step 5 : Create a media directory inside Magento\custom & upload preview.jpg file inside it !

Step 6 : Now, just run upgrade & deploy commands
A) php bin/magento setup:upgrade
B) php bin/magento setup:static-content:deploy
Wednesday, 5 October 2016
Magento 2 : Method to use SQL query
Hello Friends,
Magento 2.X is use Resource Connection Method for fetch data from the Database, Which is little bit different from the Magento 1.X
I have used code like below, and I hope it will helps to you also,
Here, I show the code for SELECT query for magento2
1) $this->_resources= \Magento\Framework\App\ObjectManager::getInstance()
->get('Magento\Framework\App\ResourceConnection');
2) $connection = $this->_resources->getConnection();Magento 2.X is use Resource Connection Method for fetch data from the Database, Which is little bit different from the Magento 1.X
I have used code like below, and I hope it will helps to you also,
Here, I show the code for SELECT query for magento2
1) $this->_resources= \Magento\Framework\App\ObjectManager::getInstance()
->get('Magento\Framework\App\ResourceConnection');
3) $Table_Name = $this->_resources->getTableName('TABLE NAME');
4) $data = $connection->fetchAll('SELECT * FROM '.$Table_Name.' WHERE
Field_Name=Value');
you just copy & paste this in related *.phtml or Controller files !
If you want to use Insert or Update then just replace Select query, and it will work !
For, Insert replace line number (4)
4) $data = $connection->fetchAll('INSERT into '.$Table_Name.'
VALUES ('value1','value2');
For, Update replace line number (4)
4) $data = $connection->fetchAll('UPDATE '.$Table_Name.'
SET column1=value1,column2=value2 WHERE id=1;
This is working fine for me in Magento 2.0 !
Tuesday, 24 May 2016
Automatic item updates: Missing schema.org microdata availability information - Google Data Feed
Hi,
You have set auto update setting for you Google Data Feed. You can see the setting of Automatic item updates setting over here,
1) Click on setting on left sided menu list at bottom
2) Click on Automatic item updates
3) Can see Attributes to be updated
Now, Auto item updates very helpful for increase the site performance and give accurate details of sites to the end users.
such as, If your X product data feed price is $55.00 while upload data feed to google merchant but same X product price will change by $50.00 then google automatic update X product price to $50.00 to data feed.
suppose, If you are getting this type of warning from Google it means google can not crawl the product availability information from your particular product leading page OR what micro data you set its structure is wrong !
If you set Micro data information then you can check it with google tool, https://search.google.com/structured-data/testing-tool
If you didn't set the schema information for product leading page then you follow, http://www.schema.org/docs/gs.html
Here some necessary micro-data properties are
<div itemscope itemtype="http://schema.org/Product">
You have set auto update setting for you Google Data Feed. You can see the setting of Automatic item updates setting over here,
1) Click on setting on left sided menu list at bottom
2) Click on Automatic item updates
3) Can see Attributes to be updated
Now, Auto item updates very helpful for increase the site performance and give accurate details of sites to the end users.
such as, If your X product data feed price is $55.00 while upload data feed to google merchant but same X product price will change by $50.00 then google automatic update X product price to $50.00 to data feed.
suppose, If you are getting this type of warning from Google it means google can not crawl the product availability information from your particular product leading page OR what micro data you set its structure is wrong !
If you set Micro data information then you can check it with google tool, https://search.google.com/structured-data/testing-tool
If you didn't set the schema information for product leading page then you follow, http://www.schema.org/docs/gs.html
Here some necessary micro-data properties are
<div itemscope itemtype="http://schema.org/Product">
- <img itemprop="image" src="testing.jpg" alt="Test Demo"/>
- <span itemprop="name">Product Name</span>
- /*Product Pricing should under offers property*/
- <div itemprop="offers" itemscope itemtype="http://schema.org/Offer">
- <span itemprop="priceCurrency">USD</span>
- <span itemprop="price">100</span>
- <link itemprop="availability" href="http://schema.org/InStock" />
- </div>
Monday, 11 April 2016
Magento : Add last increment id of "sales_flat_quote_item" in another table
Magento
$production = Mage::getSingleton('core/session')->getproValue($production); /* This is the session value which is set on Category/List page */
$shipping = Mage::getSingleton('core/session')->getshipValue($ship); /* This is the session value which is set on Category/List page */
/* This is code for Change Row Data of the product in cart and add Shipping charge in to that product into cart
* Changes By Rixit
// */
$connection = Mage::getSingleton('core/resource')
->getConnection('core_read');
$select = $connection->select()
->from('sales_flat_quote_item', array('MAX(item_id) as itn')); // select * from tablename or use array('id','name') selected values
$rowsArray = $connection->fetchAll($select); // return all rows
$rowArray =$connection->fetchRow($select); //return row
$temp = $rowArray['itn'];
$select1 = $connection->select()
->from('sales_flate_lastinsertd_id', array('MAX(last_inserted_id) as itn1')); // select * from tablename or use array('id','name') selected values
$rowsArray = $connection->fetchAll($select1); // return all rows
$rowArray =$connection->fetchRow($select1); //return row
$itnew = $rowArray['itn1'];
if( ($temp != $itnew) && ($temp >= $itnew) )
{
$total = $production + $shipping;
$connection = Mage::getSingleton('core/resource')
->getConnection('core_write');
$connection->beginTransaction();
$fields = array();
$fields['last_inserted_id']= $temp;
$fields['production_time']= $production;
$fields['shipping_time']= $shipping;
$fields['total']= $total;
$connection->insert('sales_flate_lastinsertd_id', $fields);
$connection->commit();
}
else
{
//echo "Riisdfs";
}
/*
* End of Changes By Rixit
// */
$shipping = Mage::getSingleton('core/session')->getshipValue($ship); /* This is the session value which is set on Category/List page */
/* This is code for Change Row Data of the product in cart and add Shipping charge in to that product into cart
* Changes By Rixit
// */
$connection = Mage::getSingleton('core/resource')
->getConnection('core_read');
$select = $connection->select()
->from('sales_flat_quote_item', array('MAX(item_id) as itn')); // select * from tablename or use array('id','name') selected values
$rowsArray = $connection->fetchAll($select); // return all rows
$rowArray =$connection->fetchRow($select); //return row
$temp = $rowArray['itn'];
$select1 = $connection->select()
->from('sales_flate_lastinsertd_id', array('MAX(last_inserted_id) as itn1')); // select * from tablename or use array('id','name') selected values
$rowsArray = $connection->fetchAll($select1); // return all rows
$rowArray =$connection->fetchRow($select1); //return row
$itnew = $rowArray['itn1'];
if( ($temp != $itnew) && ($temp >= $itnew) )
{
$total = $production + $shipping;
$connection = Mage::getSingleton('core/resource')
->getConnection('core_write');
$connection->beginTransaction();
$fields = array();
$fields['last_inserted_id']= $temp;
$fields['production_time']= $production;
$fields['shipping_time']= $shipping;
$fields['total']= $total;
$connection->insert('sales_flate_lastinsertd_id', $fields);
$connection->commit();
}
else
{
//echo "Riisdfs";
}
/*
* End of Changes By Rixit
// */
Thursday, 7 April 2016
Command Promt : php is not recognized as an internal or external command
Set PHP environment variable to the System for run PHP from CMD (Command Prompt)
Step 1 : Open properties of My Computer (Right Click on My Computer)
Step 2 : Click on "Advance system settings"
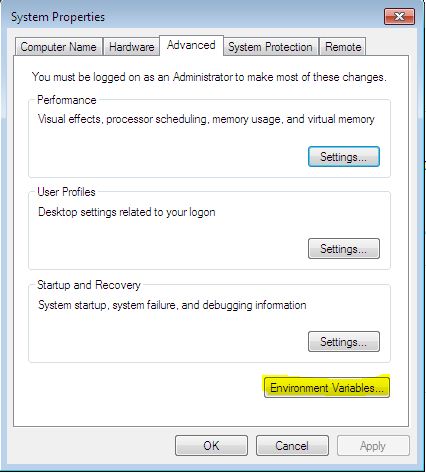
 Step 3 : Can see popup of "System Properties"
Click on "Environment Variable" button


Append C:\wamp\bin\php\php5.5.12; at last (Note :- replace php5.5.12 with your php version)

Step 5 : Close / Open CMD (Command Prompt) again
Now, It's solved !
Step 2 : Click on "Advance system settings"

Click on "Environment Variable" button
Step 4 : Can see popup of Environment Variable
Set System variable path for PHP

Append C:\wamp\bin\php\php5.5.12; at last (Note :- replace php5.5.12 with your php version)

Step 5 : Close / Open CMD (Command Prompt) again
Now, It's solved !
Magento 2 : CSS and Javascript no loading after installation
This is an initial issue with magento 2, After Installation Front-End and Back-End CSS / JS do not work.
Using following steps, it is getting work easily for magento 2 !
This is creating frontend / adminhtml directory to the "pub/static/" directory.
Using following steps, it is getting work easily for magento 2 !
This is creating frontend / adminhtml directory to the "pub/static/" directory.
Using Command Prompt(CMD) set CSS & JS for Magento2
Step 1 : Run CMD
Step 2 : Goto Magento installation directory using
CD wamp/www/[Magento dir.]
Step 3 : Run
php bin/magento setup:static-content:deploy
If you are getting problem of
"php is not recognized as an internal or external command" [Click here...]
Step 4 : Run
php bin/magento indexer:reindex
Step 5 : Delete Cache from
var/cache/[delete all dir.]
It's getting work for Front-end & Back-end !
Step 2 : Goto Magento installation directory using
CD wamp/www/[Magento dir.]
Step 3 : Run
php bin/magento setup:static-content:deploy
If you are getting problem of
"php is not recognized as an internal or external command" [Click here...]
Step 4 : Run
php bin/magento indexer:reindex
Step 5 : Delete Cache from
var/cache/[delete all dir.]
It's getting work for Front-end & Back-end !
Tuesday, 9 June 2015
Magento : Update cart price using the observer event
Hello Friends,
Using Observer,we have seen how to set the custome price, Check Here
Now, We are going for update the product with the custome price, because in magento, for the set any custome price, update custome price, there are different Observer Events which is help us for making proper customization.
A) Open Module Config.xml file which is located at etc directory of Module
[This module is same which we use for the Set Custome price]
B) Here, the code of observer event for update price
{Namespace}/{Module Name}/Model/Observer.php
D) In Observer.php add updatecustomprice function
Enjoy, This is work for me in Magento 1.7.0.2
Using Observer,we have seen how to set the custome price, Check Here
Now, We are going for update the product with the custome price, because in magento, for the set any custome price, update custome price, there are different Observer Events which is help us for making proper customization.
A) Open Module Config.xml file which is located at etc directory of Module
[This module is same which we use for the Set Custome price]
B) Here, the code of observer event for update price
Magento
<frontend>
...................
<events>
<checkout_cart_product_update_after> <!--Here Event Name as per your Requirement -->
<observers>
<{Namespace}_{Module Name}_Model_Observer>
<type>singleton</type>
<class>{Namespace}_{Module Name}__Model_Observer</class>
<method>updatecustomprice</method>
</{Namespace}_{Module Name}__Model_Observer>
</observers>
</checkout_cart_product_update_after>
</events>
.................
</frontend>
C) Now, Create or Update [if alreay you have] Observer.php in Model Directory...................
<events>
<checkout_cart_product_update_after> <!--Here Event Name as per your Requirement -->
<observers>
<{Namespace}_{Module Name}_Model_Observer>
<type>singleton</type>
<class>{Namespace}_{Module Name}__Model_Observer</class>
<method>updatecustomprice</method>
</{Namespace}_{Module Name}__Model_Observer>
</observers>
</checkout_cart_product_update_after>
</events>
.................
</frontend>
{Namespace}/{Module Name}/Model/Observer.php
D) In Observer.php add updatecustomprice function
Magento
class {Namespace}/{Module Name}_Model_Observer
{
public function updatecustomprice(Varien_Event_Observer $observer) {
$item = $observer->getQuoteItem();
$custom_vals = $_SESSION['custom_vals'];
if($custom_vals != '')
{
$additionalOptions = array(array(
'label' => '',
'value' => $custom_vals,
));
$item->addOption(array(
'code' => 'additional_options',
'value' => serialize($additionalOptions),
));
unset($_SESSION['custom_vals']);
}
$price = 123; //Here, set the Custom Price for Item
$item->setCustomPrice($price); // This set the Custom Price in Quote of cart
$item->setOriginalCustomPrice($price);
$item->getProduct()->setIsSuperMode(true);
}
}
E) Now, Clear all cache of site from admin{
public function updatecustomprice(Varien_Event_Observer $observer) {
$item = $observer->getQuoteItem();
$custom_vals = $_SESSION['custom_vals'];
if($custom_vals != '')
{
$additionalOptions = array(array(
'label' => '',
'value' => $custom_vals,
));
$item->addOption(array(
'code' => 'additional_options',
'value' => serialize($additionalOptions),
));
unset($_SESSION['custom_vals']);
}
$price = 123; //Here, set the Custom Price for Item
$item->setCustomPrice($price); // This set the Custom Price in Quote of cart
$item->setOriginalCustomPrice($price);
$item->getProduct()->setIsSuperMode(true);
}
}
Enjoy, This is work for me in Magento 1.7.0.2
Saturday, 6 June 2015
jQuery : Detect Mobile Device and identify company
jQuery
/*Detect device*/
function detectdevice()
{
/*This will return TRUE if its Mobile Device otherwise give False*/
return (/android|webos|iphone|ipad|ipod|blackberry|iemobile|opera mini/i.test(navigator.userAgent.toLowerCase()));
}
console.log(detectdevice());
function detectdevice()
{
/*This will return TRUE if its Mobile Device otherwise give False*/
return (/android|webos|iphone|ipad|ipod|blackberry|iemobile|opera mini/i.test(navigator.userAgent.toLowerCase()));
}
console.log(detectdevice());
jQuery : ID is exist or not !
jQuery
/*Check any ID exist or not*/
<div id='id1'></div>
<script type="text/javascript">
var id_exist = jQuery('#id1').length;
console.log(id_exist);
/*This will return 0 if ID not exist otherwise will get 1*/
</script>
<div id='id1'></div>
<script type="text/javascript">
var id_exist = jQuery('#id1').length;
console.log(id_exist);
/*This will return 0 if ID not exist otherwise will get 1*/
</script>
jQuery : Check radio button is checked or not
jQuery
/*Check Radio button is checked or not*/
<script type="text/javascript">
if(jQuery('#id1').is(':checked')==true)
{
/*Something Code*/
}
else
{
/*Something Code*/
}
</script>
<script type="text/javascript">
if(jQuery('#id1').is(':checked')==true)
{
/*Something Code*/
}
else
{
/*Something Code*/
}
</script>
jQuery : Remove or Delete value from the array
Hello Friends,
Here, Using jQuery remove the Value and index from the array !
/*Remove Values and index from Array*/
/*Array['Apple','Banana','Lemon']*/
I hope this will helpful to you !
Thanks
Here, Using jQuery remove the Value and index from the array !
/*Remove Values and index from Array*/
jQuery
var sample_array = new Array('Apple','Banana','Mango','Lemon');
var val = "Mango";
remove_item(sample_array,val);
var remove_item = function (arr, value) {
var b = '';
for (b in arr) {
if (arr[b] === value) {
arr.splice(b, 1);
break;
}
}
return arr;
}
/*Result will be*/var val = "Mango";
remove_item(sample_array,val);
var remove_item = function (arr, value) {
var b = '';
for (b in arr) {
if (arr[b] === value) {
arr.splice(b, 1);
break;
}
}
return arr;
}
/*Array['Apple','Banana','Lemon']*/
I hope this will helpful to you !
Thanks
jQuery : Check image exist or not on location
Hello Friends,
Sometimes we need to check, Is file is exist or not on particular location?
So, for this using below method we can check the file is exist or not !
Sometimes we need to check, Is file is exist or not on particular location?
So, for this using below method we can check the file is exist or not !
jQuery
<script type="text/javascript">
function imageExists(url, callback) {
var img = new Image();
img.onload = function() { callback(true); };
img.onerror = function() { callback(false); };
img.src = url;
}
function onload(id) /*This function will use while Mouseover event */
{
var imageUrl = "Image File URL";
imageExists(imageUrl, function(exists) {
if(exists==true){
/*Something Code here*/
}else{
/*Something Code here*/
}
});
}
</script>
function imageExists(url, callback) {
var img = new Image();
img.onload = function() { callback(true); };
img.onerror = function() { callback(false); };
img.src = url;
}
function onload(id) /*This function will use while Mouseover event */
{
var imageUrl = "Image File URL";
imageExists(imageUrl, function(exists) {
if(exists==true){
/*Something Code here*/
}else{
/*Something Code here*/
}
});
}
</script>
PHP : Get Array of CSV file in PHP
Hello Friends,
Method 2::
Here, second method for read the CSV file, its returns Array of the CSV data !
If you want to read CSV line by line you can use Method 1 also,
Also, need to get PHP array to jQuery refer this Link,
May this help you !
Method 2::
Here, second method for read the CSV file, its returns Array of the CSV data !
PHP
<?php
$file = "Path of File Name";
$csv = new Varien_File_Csv();
$data = $csv->getData($file);
Print_r($data); /*This will give Array of CSV file data*/
?>
$file = "Path of File Name";
$csv = new Varien_File_Csv();
$data = $csv->getData($file);
Print_r($data); /*This will give Array of CSV file data*/
?>
If you want to read CSV line by line you can use Method 1 also,
Also, need to get PHP array to jQuery refer this Link,
May this help you !
PHP : Read PHP array using jQuery JSON
Hello Friends,
I got this method after so many surfing, I hope this will help you for read PHP array to the jQuery.
Using this can get the PHP array in JavaScript array!
Hope, this will useful to you !
I got this method after so many surfing, I hope this will help you for read PHP array to the jQuery.
Using this can get the PHP array in JavaScript array!
PHP
<?php
$file = "Path of File Name";
$csv = new Varien_File_Csv();
$data = $csv->getData($file);
Print_r($data); /*This will give Array of CSV file data*/
?>
<script type="text/javascript">
var sample = new Array();
var vals = 'sample ';
sample [vals] = '<?php echo json_encode($data) ?>';
var sample_data = JSON.parse(sample ["sample"]);
</script>
$file = "Path of File Name";
$csv = new Varien_File_Csv();
$data = $csv->getData($file);
Print_r($data); /*This will give Array of CSV file data*/
?>
<script type="text/javascript">
var sample = new Array();
var vals = 'sample ';
sample [vals] = '<?php echo json_encode($data) ?>';
var sample_data = JSON.parse(sample ["sample"]);
</script>
Hope, this will useful to you !
Thursday, 16 April 2015
Magento : Display product image in order transaction mail
Hi, Some Time client want some extra, just like here,
For set Product image with the mails in Magento you need to follow just 2 change for that
1) File for Edit : app/design/frontend/base/default/template/email/order/items.phtml
After the below mentioned line
<th align="left" bgcolor="#EAEAEA" style="font-size:13px; padding:3px 9px"><?php echo $this->__('Sku') ?></th>
Add this,
<th align="left" bgcolor="#EAEAEA" style="font-size:13px; padding:3px 9px"><?php echo $this->__('Image') ?></th>
2) File for Edit :
app/design/frontend/base/default/template/email/order/items/order/default.phtml
After the below mentioned line
<td align="left" valign="top" style="font-size:11px; padding:3px 9px; border-bottom:1px dotted #CCCCCC;"><?php echo $this->escapeHtml($this->getSku($_item)) ?></td>
Add this,
<td align="center" valign="top" style="font-size:11px; padding:3px 9px; border-bottom:1px dotted #CCCCCC;">
<img src="<?php echo $this->helper('catalog/image')->init(Mage::getModel('catalog/product')->load($_item->getProductId()), 'small_image')->resize(135); ?>" width="135" height="135" alt="<?php echo $this->htmlEscape($_item->getName()) ?>" />
</td>
Now, Go to admin and Clear Cache, Make Order you got the Product image also with order !
Wednesday, 16 July 2014
jQuery : Remove space form string using JQUERY
HI, Some time we need to remove the Space from the String,
Here the Code for remove Special Characters and Space between string
var Demo = new String('This ::: is / the Test');
temp = temp.replace(/[^a-zA-Z 0-9]+/g,'');
console.log(temp.replace(/ +/g, ""));
/*Best Seller base on order */
<?php
$storeId = Mage::app()->getStore()->getId();
$product = Mage::getResourceModel('reports/product_collection')
->addOrderedQty()
->addAttributeToSelect(array('name', 'price', 'small_image')) //edit to suit tastes
->setStoreId($storeId)
->addStoreFilter($storeId)
->setOrder('ordered_qty', 'desc'); //best sellers on top
Mage::getSingleton('catalog/product_status')->addVisibleFilterToCollection($product);
Mage::getSingleton('catalog/product_visibility')->addVisibleInCatalogFilterToCollection($product);
$count = 0;
foreach($products as $pro)
{
$count++;
if($count <= 3)
echo $pro->getorder_items_name();
}
?>
Here the Code for remove Special Characters and Space between string
var Demo = new String('This ::: is / the Test');
temp = temp.replace(/[^a-zA-Z 0-9]+/g,'');
console.log(temp.replace(/ +/g, ""));
/*Best Seller base on order */
<?php
$storeId = Mage::app()->getStore()->getId();
$product = Mage::getResourceModel('reports/product_collection')
->addOrderedQty()
->addAttributeToSelect(array('name', 'price', 'small_image')) //edit to suit tastes
->setStoreId($storeId)
->addStoreFilter($storeId)
->setOrder('ordered_qty', 'desc'); //best sellers on top
Mage::getSingleton('catalog/product_status')->addVisibleFilterToCollection($product);
Mage::getSingleton('catalog/product_visibility')->addVisibleInCatalogFilterToCollection($product);
$count = 0;
foreach($products as $pro)
{
$count++;
if($count <= 3)
echo $pro->getorder_items_name();
}
?>
Wednesday, 9 July 2014
Magento : Add Meta Title field in CMS pages
In this Blog I written about to set the Meta title field inside the CMS Page.
Here, Some steps need to follow for Meta Title Field
1) Open File Meta.php
Location = /app/code/core/Mage/Adminhtml/Block/Cms/Page/Edit/Tab/Meta.php
2) Copy - Paste this code after
$fieldset = $form->addFieldset('meta_fieldset', array('legend' => Mage::helper('cms')->__('Meta Data'), 'class' => 'fieldset-wide'));
/*Copy*/
$fieldset->addField('meta_title', 'text', array(
'name' => 'meta_title',
'label' => Mage::helper('cms')->__('Title),
'title' => Mage::helper('cms')->__('Meta Title'),
'disabled' => $isElementDisabled
));
3) Open Database - Go to table - cms_page
4) write this query
ALTER TABLE `cms_page` ADD `meta_title` VARCHAR(100) NOT NULL AFTER `root_template`;
Now, Check any CMS page in admin side !!
Here, Some steps need to follow for Meta Title Field
1) Open File Meta.php
Location = /app/code/core/Mage/Adminhtml/Block/Cms/Page/Edit/Tab/Meta.php
2) Copy - Paste this code after
$fieldset = $form->addFieldset('meta_fieldset', array('legend' => Mage::helper('cms')->__('Meta Data'), 'class' => 'fieldset-wide'));
/*Copy*/
$fieldset->addField('meta_title', 'text', array(
'name' => 'meta_title',
'label' => Mage::helper('cms')->__('Title),
'title' => Mage::helper('cms')->__('Meta Title'),
'disabled' => $isElementDisabled
));
3) Open Database - Go to table - cms_page
4) write this query
ALTER TABLE `cms_page` ADD `meta_title` VARCHAR(100) NOT NULL AFTER `root_template`;
Now, Check any CMS page in admin side !!
Monday, 31 March 2014
Magento Images not displayed in Admin
HI,
Some times in Magento create amazing issues, in admin or for fornt end also
Recently, I am getting this type of issue, In side admin I can't see the product images after the Inserting the product
Some times in Magento create amazing issues, in admin or for fornt end also
Recently, I am getting this type of issue, In side admin I can't see the product images after the Inserting the product
 |
| Product Images no display in admin |
for solve this type of issue
Just open media directory using FTP and just change the name of .htaccess to .htaccess_old
And you have solve the Image issue.
Enjoy::::
Subscribe to:
Posts (Atom)